


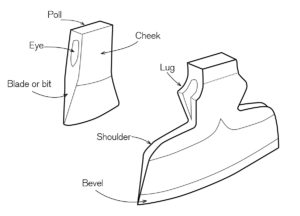
 There are two basic types of ax: those with a centered cutting edge (the most common kind), and those where the blade has a single bevel and the cutting edge is not on the central axis of the head (side axes).
The article mainly talks about the centered-edge type. There are three basic shapes—one for felling or general shaping, one for splitting and, most ubiquitous of all, the utility ax. Describing how to sharpen a utility ax. Describing how to sharpen a utility ax is a bit like describing how to sharpen a handsaw for both crosscutting and ripping; it is hardly worth the effort. The tool becomes such a mass of compromises that it performs no single function well. All that can be said of a utility ax is that you have two choices: either you continue to sharpen it the way it came from the factory, concentrating on a keen edge and ignoring edge geometry, or you can bias the shape to suit the work most frequently demanded of the tool (that is, rework the basic shape as required). Actually, there is a third choice. Get rid of the utility ax and buy what you really need.
FELLING AND NOTCHING AXES
Felling and notching axes are the ballerinas of the ax world, graceful, delicately shaped and joy in performance. A well-shaped felling ax can drop a 4-in. diameter tree with two strokes. It will notch a tree for felling in seconds or shape timber more rapidly than a power tool. To use a good felling ax on green wood is to experience the origins of the Paul Bunyan stories.
A felling ax is designed for maximum penetration and minimum wedging action. It is not just that it splits wood poorly, but it can become lodged so solidly in the end grain that it might have to be cut out. Any attempt at levering it out using the handle would only break it.
For working dry wood, either milled timbers or deadwood, the edge should have an included angle of about 20° to 25°, 10° to 12° per side. For green wood, this can be reduced to an included angle of 15° to 20°. These angles may seem low compared with something like a mortise chisel, which performs basically the same function, but the forces experienced by an ax blade are normally more balanced.
 A chisel has the bending forces applied primarily to the beveled side. With an ax, the forces are applied more evenly to both sides of the blade; the head tends to follow the path of least resistance as it penetrates the wood.
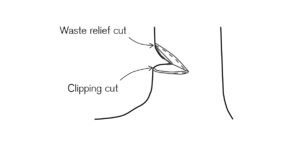
There are exceptions to this general rule. In notching a tree for felling, an ax is used somewhat like a mortise chisel. Waste is relieved from the upper part of the cut and then clipped off at the bottom with a horizontal cut (see the drawing above). The horizontal cut most closely imitates the action of a mortise chisel. The difference is that the direct cross-grain cut is usually made first when mortising but last when deepening a notch with an ax. The forces on the ax edge are still uneven but less so than in the case of mortise chisel.
The other case where extraordinary forces are applied to felling ax is in trimming dead branches, where there is deadwood encased by the branch collar. Just as pin knock off dead branches, as long as the wood is frozen so that the branches will snap off readily just at the branch collar. Partly this is done for general efficiency, but also to avoid cutting into dead branches, which have the same effect on an ax blade as pin knots have on a plane. The concentration of resisting forces on a small section of blade can cause the section to curl or crumble.
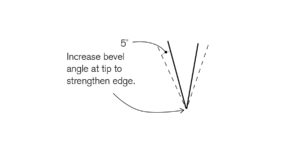 If after shaping an ax head you find the edge too weak in use, just increase the bevel angle a few degrees (no more than 5°), for the last 1/16 in. or so, as you would with a chisel (see the drawing above). This will strengthen the edge without materially affecting performance. The ax will not penetrate quite as deeply with each swing, but it will work consistently without the need for constant maintenance.
DOUBLE-BIT AXES
Double-bit axes are seldom seen today, but they were in common use a century ago. In fact, they were more commonly used as felling axes in North America than were the single-bit style.
There were three main reasons that double-bit axes were preferred. First, they have better balance than single-bit style axes; the center of gravity of the head is at the middle of the eye. With a single-bit ax, there is usually more mass forward of the eye. Second, double-bit axes have two edges; if one is dulled accidentally, it is not necessary to stop and sharpen that edge immediately. And, third, the two edges were often used for different purposes and accordingly were often shaped differently.
A double-bit ax has quite a different feel from a single bit. The handle is straight and usually more oval in cross section. The perfect balance makes it easier to aim accurately and generally lets you do more precise work. To be efficient in using any ax you should be able to strike the same point repeatedly. This is particularly true in large-diameter work where a cut may have to be extended some distance around a log. Unless it is extended in tearing fibers rather than severing them.
For the modern user, probably the most important feature of the double-bit ax, next to the wonderful balance, is the ability to shape two edges differently, one of felling and one for limbing. The edge for limbing would have a higher included angle than the edge for felling. To avoid confusion, it is useful to have a handy visual indicator that tells you which edge is which. Initially, the label on the ax head can be used as a guide, but if that has been removed either intentionally or with wear, put a dot of paint on the head or the handle as a guide.
FILING AN AX HEAD
An 8-in. mill bastard file is ideal for shaping most ax heads. The steel in the head is usually no harder than Rc55 and can be filed readily. A mill file will remove stock quickly and controllably. With a bit of practice, it is easy to maintain angles, particularly when you use the height of the file above the ax eye as an indicator of angle. it is easy to maintain angles, particularly when you use the height of the file above the ax eye as an indicator of angle. It is safest to file an ax from the eye side of the edge, although almost every woodsman I have known files directly toward the edge with cavalier abandon.
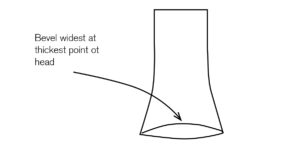 To get a consistently shaped wedge, it will probably be necessary to remove more material from the center portion of the head than at the tips of the face (see the drawing below). Among older axes you will often find a substantial swelling toward the center of the head, feathering off both fore and aft. When you file such an ax you will get a much wider bevel in the center of the head than at either tip. One log builder I know files his felling ax by resting the tip of the file at the center of the ax head near the poll and then using a draw-filing technique in a semicircular motion to shape the face. It seems to work well for him, although I find it to be an uncomfortable motion and prefer striking a basic bevel angle at the center of the face and extending it in each direction.
There is a tendency to file a steeper bevel angle at the center of the face than at either tip. Partly this is dictated by the above-mentioned swelling at the center and partly by the tendency to file the lowest bevel angle where it is easiest to file the lowest bevel angle. There is no great harm in doing this unless the included bevel angle near the edge. More usual is that the bevel angle is too great at the center of the ax, causing too much wedging action in use and reducing penetration.
HONING THE EDGE
Honing the edge of an ax is similar to honing a drawknife or any other tool that requires freehand stoning. For reasons of tradition, this is still one tool that I prefer to hone with an oil stone. Unquestionably a large part of this is the memory of my father honing axes. He used a bit of 3-In-One or neat’s-foot oil, whichever was handiest, and an easy rotary motion with the stone. This technique leaves a surface finish a bit like the geometric pattern that you find on the inside of an old pocket watch case. After honing with the oil stone, I finish off in a highly untraditional manner—a chromium-oxide-charged felt wheel on a power grinder. It would have made my father shake his head. I’m sure.
There is no reason that all of this could not be done with water stones in sequence, or with just one water stone in the 1000x range and a rigid strop charged with chromium oxide. You could also hone the edge with several grits of belt on a belt sander.
MAINTAINING THE EDGE ON AN AX
As well as shaping the face properly and using an ax only for its intended purpose, the next best thing you can do is keep it in a sheath to avoid accidental dulling. In the same vein, be aware that there is often a lot of grit embedded in the bark near the base of a tree. In books on early logging practices, you will see photographs where the bark has been removed in a ring around the tree where the saw cut will be made. This was done to remove the grit-impregnated bark so it would not dull the saw blade. You can do the same in the area where you intend to notch the tree with your felling ax, but since you would normally have to use an ax to remove the bark this all gets very fussy. With some trees, it is very easy to strip the bark from a safe cut a foot or more up to the tree, with others not so easy. The degree of fussiness you bring to your woodworking activities I leave to you.